1.2 – Arduino Blink – External LED
In our first Arduino project, we caused the built-in LED to blink. This was accomplished by changing the state of the Digital Pin 13 from LOW to HIGH.
Our next step is to cause an externally connected LED to turn on and off. Suppose we want to connect an LED to Digital Pin 8 and make that blink, what would we have to do? Take a look at your code from project 1.1. What do you think you can change in that code to make an LED connected to Pin 8 blink?
First, in the setup() function we will have to change the first argument in the call to pinMode from 13 to 8.
Next we, inside our loop function, we will change the first argument in our calls to digitalWrite from 13 to 8 as well.
The first argument in pinMode and digitalWrite identifies the pin on the Arduino we want to set.
Your modified code should look similar to:
/*
NAME
External LED Blink
Engineering Period 1
DATE

Revision History
DATE  |    NAME    |     Changes Made
------|------------|------------------------------
TODAY |  My Name   |  Initial Implementation

*/

void setup() {

  //pin 8 is the pin we want to use this time
  pinMode (8, OUTPUT);

}

void loop() {
  // put your main code here, to run repeatedly:

  //Set the digital pin 8 to HIGH (on)
  digitalWrite(8,HIGH);
  //Wait 1 second
  delay(1000);

  //Set the digital pin 8 to LOW (OFF)
  digitalWrite(8, LOW);
  //Wait 1 second.
  delay(1000);

}
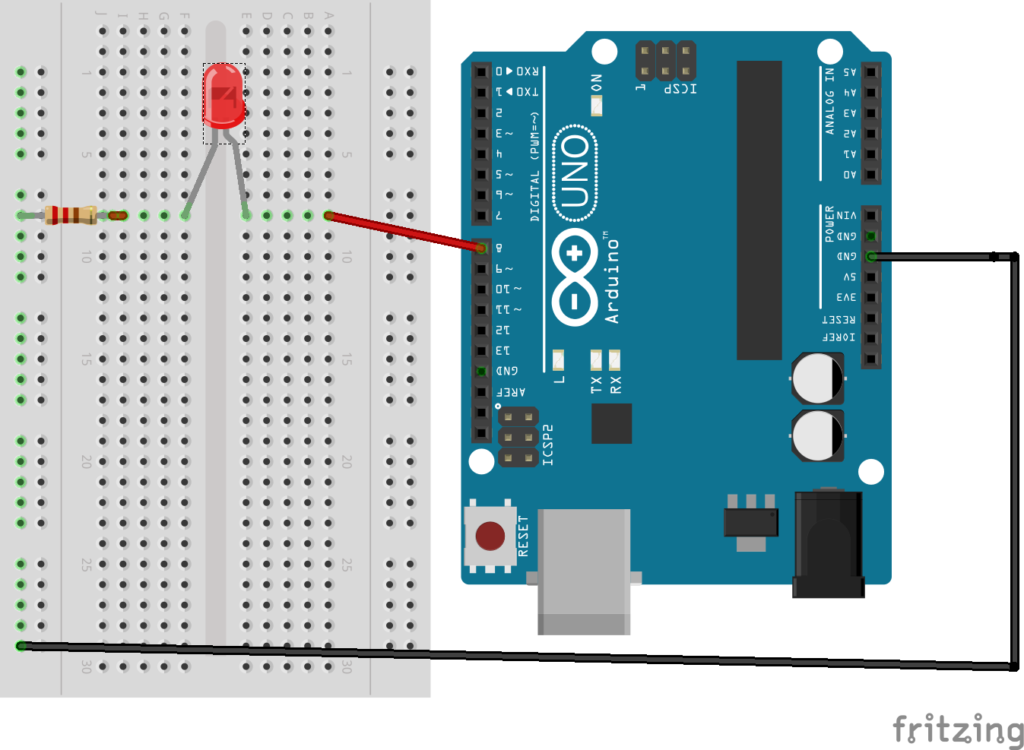
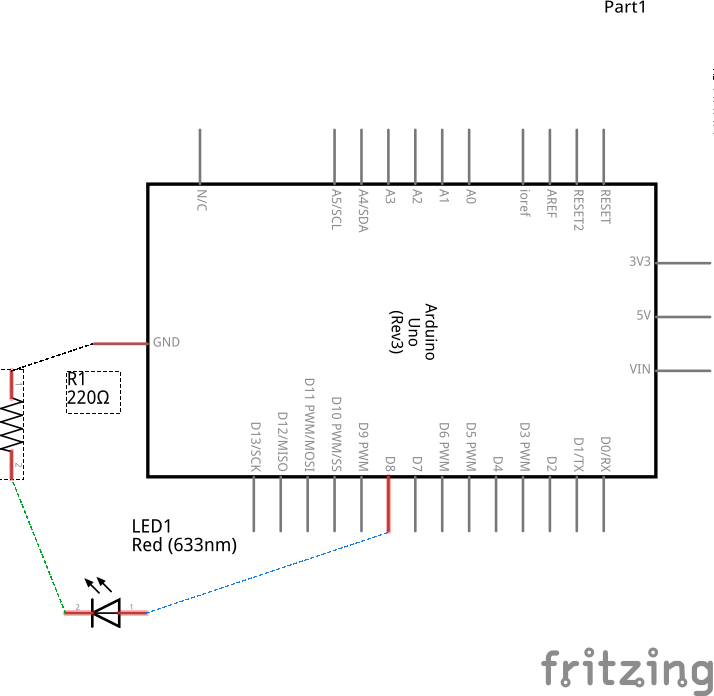
Next, we need to connect our LED to the Arduino. Since we are connecting an external LED we will need to use a resister. A 220-ohm resistor should work for this project. After you have completed connecting your components together, upload the sketch to your Arduino. You should see the external LED blinking.


If your external LED does not blink, make sure you’ve connected the circuit properly. Remember the Anode (+) goes to the positive side. In the case of this project, it should be connected to PIN 8.
If everything is wired correctly, recheck your code for errors. Did you remember to update your pinMode and digitalWrite calls to control PIN 8?